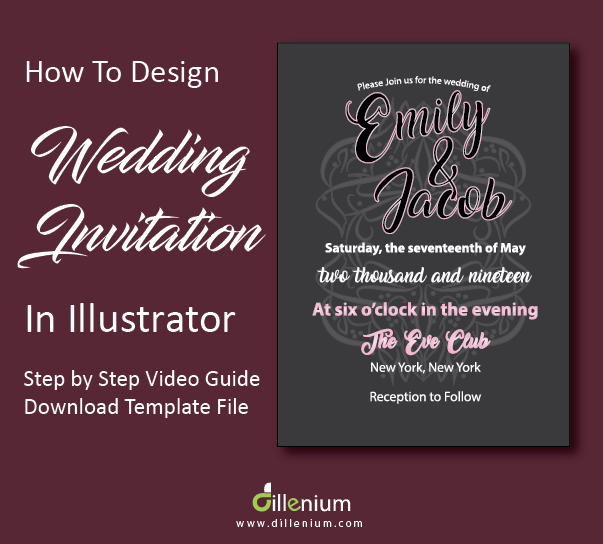
If you are exploring and looking how to design a wedding invitation in Adobe Illustrator then here you can find the way to create your own wedding invite by using all your creativity. I am showing you step by step to design modern wedding invitation with a custom touch.
Wedding is the big day of bride and groom’s life and everybody wants to get perfect on their big day. From wedding dress to wedding kit especially the wedding invitations like a bridal shower, Save the date card, wedding day invitation, and other related invites have a big importance. On a wedding day, everybody wants to get best of the best way
Here, I want to share one thing that most of my customer, especially who wants custom wedding cards always looking for something exclusive so I ask them to share the idea so I can illustrate it accordingly to make your day memorable. Most people want something classy and others looking for modern and vintage style wedding invitations. On a wedding day, everybody wants to get best of the best way.
Here, I am sharing step by step wedding invitation design tip that you can follow and create your own wedding invitation as you like.
For your convenience, I created a video so it will be quite easy and time saving for you to watch all steps and learn the process in minimal time. I recommend you to watch the video then you can manually follow the steps as it will be quite easy for you learn. You can also download template file to work as sample. Download link is available at the end of this post below the video link.
So let’s start now!
To Start With…
You need to install Adobe Illustrator.
If you have Adobe illustrator then you can open the application.
If you don’t have then you can easily download from below link
Note: 30 days trial version is free!
Download it and install to start designing.
Step 1: Set Up New Document
- Go to File – Create New document
- Choose Size 5×7 inches
- Orientation: Portrait
- Bleed: 0.125 inches
- Color mode: CMYK
- Raster Effects – High 300 PPI
- Press Ok and go with these setting
Step 2: Setup Rulers and Guide
- Go to Views – Rulers – Show Rulers
- Check on Smart Guide in View Menu
- As I shown in Video, Follow the process to manage guideline.
Step 3: Start Designing Wedding Monogram
- First, take Ellipse tool from Shape toolbar.
- Now draw a long and thinner oval. (Check out video)
- Remove the stroke color and fill the color with Black.
- Now go to Object – Expand the layer
- Go to Window – Brushes
- Now select oval shape and drag it to Brush section
- Choose Art Brush and do the setting as shown in the video.
- Now you can use the Brush to design wedding monogram.
- For convenience, drag the guide in artboard and start your work.
- Good idea is to design One corner with a different style of patterns using the brush.
- Make design and Group it by pressing Ctrl G from the keyboard on PC.
- Now Press Ctrl C (to copy layers) and Press Ctrl V (to paste) and
- Right-click and Use Transform and Reflect Vertical.
- Press Ctrl G to group the layer and drag it to another right side.
- Now select both layers and click Ctrl C and Crtl F to place in the same place.
- Now again go to Transform and Rotate to 180 degrees and drag down.
- Select each and everything together and go to Object and Press Expand.
- Now change the color.
- Go to Window, Appearance, change the Opacity to 40%
- Now place the wedding monogram in the middle of your wedding invitation card.
Step 4: Design Content
- Write Bride and Groom Name using Text tool.
- I used font Amarillo (You can check some best wedding fonts here)
- Select text and right click and choose “Convert to Outline”
- Now make a little angling to adjust the name in card.
- Add more text and write accordingly. (Check video for complete procedure).
- Write “Please Join us for the wedding of” and place it at the top of the card.
- Select it and go to Effect – Warp – Arc and Bend it to 19%.
- Now place all the text.
- For convenience, you can copy the text from wedding template. Download link is at the end of this post.
Step 5: Save the Print Ready File
- Go to File, Click Save As PDF
- It will show the setting, Choose Adobe PDF Preset – High-Quality Print
- Mark check on option – Preserve Illustrator Editing Capabilities
- Go to Marks and Bleed – Mark check on “Use document bleed settings”
- Also mark check on “Trim Marks”
- Press Save PDF
- And now you are done! All the best…
Your wedding invitation card is ready to take to the printer. Print it and share with your loved ones.
You can let me know if you have any question. It will be my pleasure to help you out in case of query.
Watch Illustrator Video Tutorial
How to Design Wedding Invitation in Illustrator from Scratch
Download Project File: Click Here…
Wedding Related Content Might be Helpful for You:
Best Wedding Planning Website Theme for Wedding Planner
10+ Inspirational Wedding Website Ideas will Touch Your Heart
20+Best Wedding Fonts Free Download For Wedding Invitations
How to Create Your Own Printable Invitation in Illustrator – Wedding Save the date


Leave A Comment